

Basic Animation
- milesstewart
- Jan 19, 2021
- 4 min read
Today I will be following a Youtube video to learn the basics of after effects vector animation. This will include moving, resizing, rotating and bouncing of objects. Due to lock down, I am having to create new storyboards for my music videos, and I think an animation/lyric video is a very good alternative for one of my music videos.
To begin with, I was following this Youtube video: https://www.youtube.com/watch?v=iQXa8UG10DQ&ab_channel=AvnishParker
It included a vector scene, in which viewers can use to follow the tutorial, so the first step was to open this Photoshop file of different vector images in different layers, so that when you put the file into After Effects, you can edit the individual layers. Here is the original file once uploaded in After Effects. To upload Photoshop files, in which you want to edit different layers from, select import kind: composition, and editable layer styles.


The next step was to open the elements composition, to find all of the individual layers for the objects. The scene has no animations on it yet, and is a still image.

The first step for the animations, was to implement the scaling of the objects. The effect we are trying to accomplish, is where the objects spring up as the animation starts, to give the scene life. To do this, first of all we needed to ensure that the anchor point for the individual layers was at the correct place, of which should be the bottom of the object, as that is where we want the objects to spring up from. Using the Pan Behind (Anchor Point) Tool. The Anchor Point Tool and the moved anchor point to where we want the object to spring up from are both circled in red. I then did this for all of the objects.

Before we move on to the springing up of the objects, we made the rotation for the windmills. I opened the windmill layer, and selected the blade layer. Press 'R' to open the rotation menu, and then hold 'Alt' and click on the stopwatch icon, of which is what you press to add a key frame or activate the effect. Holding 'Alt' whilst pressing on the stopwatch allows for you to add an expression, of which is an instruction that lasts for the whole composition. The expression of which I used for this object was holding 'Alt' on the rotation menu, meaning the expression is to do with how the object rotates. The expression I used was time*. This means how many times the object will rotate in 1 minute. The time used was time*220, after time 120* wasn't fast enough. I made sure the anchor point for the blades was the center of the windmill, so that the blades rotated from the correct spot. Select the expression and copy and paste it into the other 2 windmills, changing the anchor point and the speed of the different turbines, for a more realistic approach.


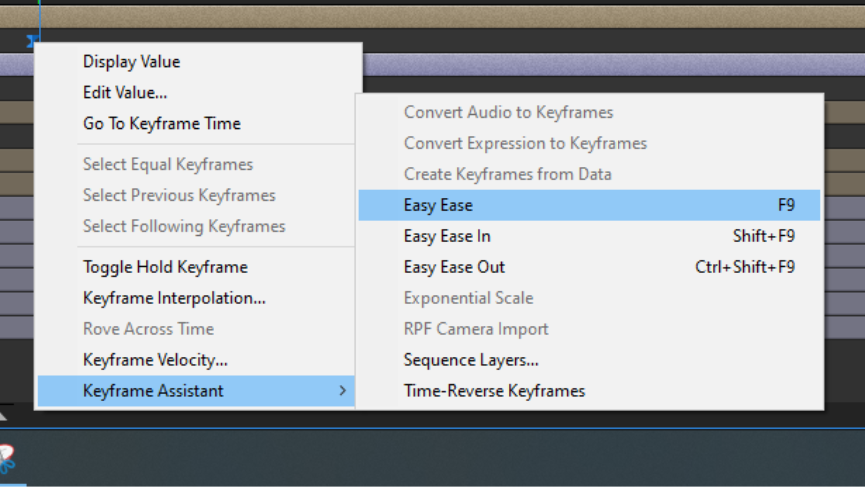
Now it was time to make the spring up effect for the objects. I started on the middle wind turbine. To start hit 'S' which brings up the scale menu. Then add a key frame around 1 second in. Go back to the start and change the scale value to 0. The effect so far is the wind turbine growing in scale over 1 second. The next step is to add another key frame slightly before the 1 second mark key frame, and change the scale to 120%. This means that the windmill up scales to 120% size, before then down scaling to 100% milliseconds later, creating a bounce affect. To improve this effect, select all of the key frames, right click them, select Key frame assistant and then select Easy Ease. This make the animations for the key frames smoother, as well as allowing for the next step, opening the graph editor.

Right click the graph and select speed graph, and make sure the graph looks like this, to achieve the selected speed effect, or play around with the graph to achieve your selected speed. We now need to copy and paste the scale from this windmill to all other layers, to give them the same effect. Ctrl + C the scale menu of the windmill layer, and then select a new layer and press Ctrl + V. You can also change when the effect starts by moving the time player head on the timeline. Having the different layers pop up at slightly different timings gives off a dynamic effect, and gives depth to the popup.

The final step was to animate the cloud and the hot air balloon. This is just a basic position change. Press P on the balloon and cloud layer to open the position menu, and select a start position by moving the timeline head to a point, select the stop watch, move the timeline head around 6 seconds and move the object. Do this for both the cloud and the balloon and then easy ease the key frames for a more smooth transition. The animation is now complete, and this is the final outcome.
I learned a lot from this tutorial, especially a lot about key shortcuts and rules about After Effects. First of all, I learned how to bounce up images, of which looks very professional and I will definitely use again. Next up I learned about holding 'Alt' when selecting the stopwatch, to apply an expression. This is very useful, and I am sure there are hundreds of expressions to learn, of which will help save a lot of time in the future. Finally I learned about the importance of easy ease on the key frames, as well as learning about the speed graph. I don't really understand what it was doing, but I will learn it as I use it more often. I am looking forward to using these techniques in my upcoming music video.


Comments