

Editing Techniques
- milesstewart
- Feb 16, 2021
- 5 min read
Updated: Mar 11, 2021
Raw footage can sometimes look alright to some extent, when the in-camera settings have been adjusted to the correct values. But the better and easier method to making videos look very professional and aesthetically amazing is to shoot in RAW and allow the rest to happen manually within premier pro. As well as the coloring and effects that you can apply within premier pro, there are also very quick and effective methods that can help edit the clips down to different times, and quickly transport the best parts of clips you have recorded, into premier pro. Today I will be explaining some very easy editing techniques within premier pro, including colorization, beat editing using markers, as well as luts and adjustment layers.
First of all, this editing technique is for music videos, or cinematic edits for videos such as vlogs, cinematics and b-roll footage. Upload all of the relevant clips to your premier pro file. After this, a good habit to get into is to go into each of the videos you have recorded, and delete any that you do not like at all, and also mark in and mark out the best parts of the remaining videos. This will give you a good indication of how much of your footage you will be using, so you can either choose more or choose less of what you have selected. Remember to mark in and out either generously or strictly, depending on how big your videos are, compared to how big the edits are going to be. The mark in/ mark out are simple buttons when you preview the footage.

The next step is to insert the audio clip that you want to edit the footage to. You can then listen to the audio clip, and using the 'M' shortcut, you will place down markers. These markers can also be placed down using the marker tool below the preview window. Place down a marker at good cut points, such as when the music has a beat change, or the sound of a certain beat such as a drum. Proceed placing markers throughout the period of the video where you can the edit to be.

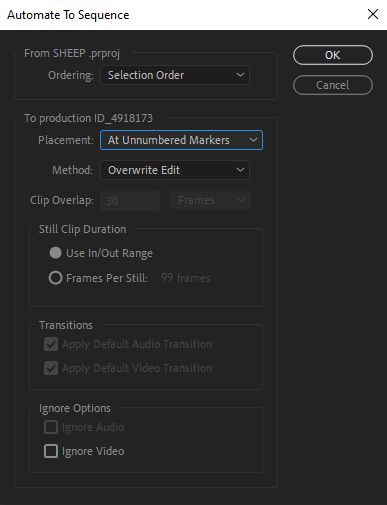
After you have first marked in and marked out all of the good parts of your footage, as well as placing down markers at good intervals, the next step is to use shortcuts, to import these marked in and out clips, between the placed marker points. To do this, go to clip < automate to sequence, and a new pop up should appear.

When the popup appears, change the placement to 'At Unnumbered Marker, as well as making sure that you select the Use In/ Out range of the clip duration. Then press ok.
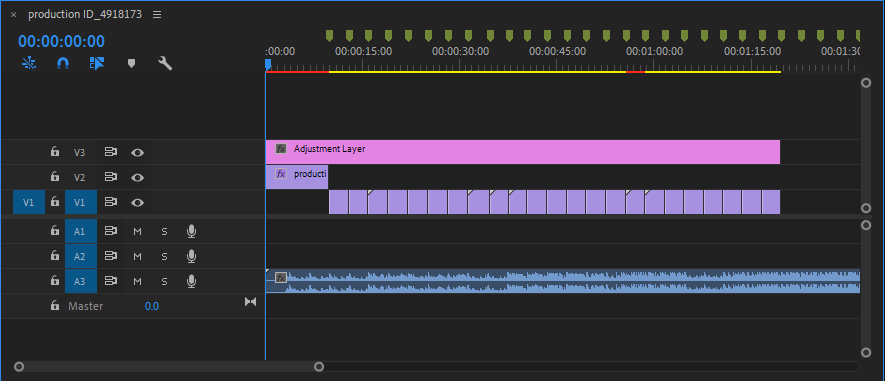
This should import all of the Marked In and Out footage in between the markers points. This is a quick and easy way to get the best parts of your clips, onto the timeline, and at good points of the audio. The next step for editing would be to fine tune the clips to the audio, which might mean making some of the clips longer or shorter. One negative from this editing style is that the clips are all in order of upload time, so you will need to manually move the clips around.

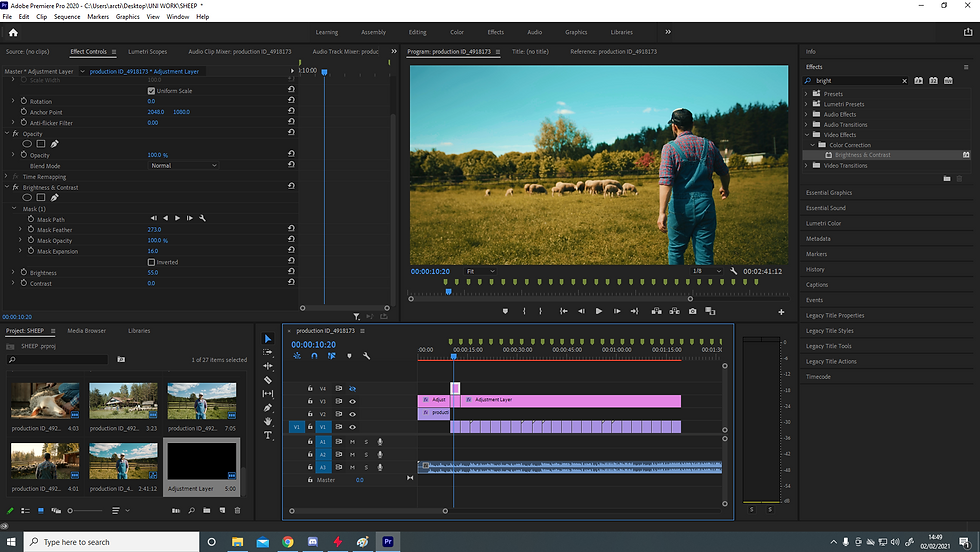
After you are happy with the placement of the clips, you can then move onto adjusting the color schemes and the aesthetics of the clips to make them more professional looking, or to adjust the mood. The best way to apply any colour changes is through the use of adjustment layers. This is because they are more easy to edit from, as they are black layers, that effects can be put onto. It also allows for you to move the adjustment layer around, by clipping it onto different clips, and it can easily be deleted. To make adjustment layers, find where the clips are and right click on a blank area and select create adjustment layer.
Within the adjustment layer there are so many different things you can apply to them to alter the look of the footage. The first thing to do is to apply the effect brightness and contrast onto the adjustment layer. This can make footage look better straight away, especially if the in camera settings were not correct when you shot the footage. Go to the effects panel and type brightness and contrast and drag the effect onto the adjustment panel. You can then adjust the effects on the left of the screen.

The next thing to help colorize the footage is to apply luts. Luts are similar to adjustment layers. They are colour palettes that go on top of footage, to alter the visuals. There are so many free luts that you can download, that alone, can make footage look incredibly improved. You can apply luts using the lumetri color drop down on the right, and change the look drop down, to find the luts. From within this panel you can adjust the overall intensity of the lut, as well as the vibrancy, saturation and sharpness. Make sure to also apply the lut to an adjustment layer and not the footage itself. Play around with the lut until you are happy, and remember to keep consistency within your projects.

Another nifty trick to apply in certain situations, is to create an adjustment layer above another adjustment layer, to further change a specific element within the footage, for instance, you like the look of the footage, but a small part of it, such as the sky is not the correct brightness or color. Create another adjustment layer on top, and apply the brightness and contrast effect, and within the editing column on the left, you should find an option under brightness and contrast, which is a pen tool. This is used to create a mask. Trace the sky accurately, and apply feather so that the effect bleeds onto the rest of the footage so it doesn't look too fake. Once you have created a mask, the effects will only apply to that area. This is a great trick to alter specific areas within footage. This also works better on still shots, or you will have to move the mask around, which is do able, but is time consuming.
The final tip for this blog post, it that if you select the 'Plus; icon under the preview tab, you can get new tools that act as shortcuts. One tool that is very useful is the 'fx' button. This can toggle all effects that have been put onto the project on and off. This can be used to compare the edited effects to the base footage.
There are so many editing techniques and color correction/ editing techniques that you can use within premier pro that can greatly increase the production quality and overall look of your projects, it is just a case of learning them as you go, and improving your skills within premier pro.


Comments